
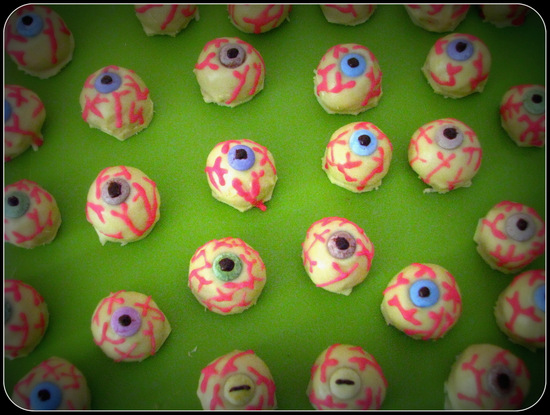
PER ITALIANO "Occhi Insanguinati"
Ok... Where did we leave off?
Well... I talked about our Horror Tunnel in my previous post and gave the recipe for Hedgehogs.
So let me talk about our supper in the cabin today and give you the recipe for those bloody eyes!
Andrea and I took care of the ornaments and interior decoration of the cabin three days prior to the supper. Come rain or shine, it didn't matter. It was indoors anyway. This way we would have one less thing to do on the last day. So we managed to make a cute Halloween decoration with no rush, which satisfied us both. Since Andrea's father needed to go there every day to feed the animals, we left the decoration of our two very "special" boards to the last day so that he wouldn't see them before.
The first board was "Missing Persons Board". I had prepared the photos on the board many days ago. There were some "manipulated" pictures of each guest. This way we had created something fun, special and exclusive to us all.

Second board was called as "Adopt a Zombie Board". ;)
I had prepared also this one long ago by using some special photo effects on the guests' photos. Additionally, we framed some of the zombie pictures and enriched the decoration by placing them over one of the cabinets in the cabin.
At the end of the night we gave them to the guests as a souvenir of this special day.

As for buying and preparing the food and the beverages, everybody contributed.
When Lucia, my mother in law, heard that we'd been planning to make Halloween themed cakes also for this year, she wanted to prepare at least a few Halloween themed food as well and asked my advice two weeks prior to the supper. I had already several ideas which I had previously seen on internet and noted. I made some more research and shared with Lucia the ideas and pictures I found. One evening we tried some of them, also with Serenella's contribution, and we enjoyed the result so Lucia decided to make them for our Halloween supper.

I didn't prepare them myself so I won't be able to give you the exact recipe for the moment, but maybe in future.. Let me tell you at least what they are made of.
- The mini mummies on the top of the collage are puff pastry wrapped sausages.
- The mummies on the bottom left of the collage are mini pizzas, decorated with Sottilette cheese stripes and olive slices.
- The mices on the bottom right of the picture are made of crackers at the bottom, cheese wedges as body (like those from the Laughing Cow), mini sausage slices as ears, quartered olives as nose, nigella seeds (as eyes) and cucumber or carrot peel as tail.
Of course what we had on our Halloween dinner table wasn't limited to these three only. Everyone prepared and brought something different. There was enough food to feed maybe another 20 people. As a matter of fact we ate the leftovers the following day.

Eventually it was time to serve the cakes but for that to happen Stefano and I had to make a short trip back home to get them because they needed to be stored in the fridge and the one in the cabin was not large enough to fit them all! As you can see below, three shelves from the top in our fridge were all dedicated to the cakes.

After the cakes having served, we revealed a very special "the most wanted fugitives" folder which included 160 very dangerous career criminals! :) There were plastic coated mug shots of the fugitives inside. We had planned to play a little fun game so we had black taped over the names. On the bottom right of the collage below, you can see one of plastic coated black taped sheets in Giuliano"'s hands. As you can guess, there were never ending guesses :)

In addition to our souvenir zombie frames, we distributed all the pictures to their owners.
At the end of the evening we were exhausted, worn out but happy.
Let's proceed to the recipe, what do you say? :)
I found this recipe in Giallo Zafferano. It is so delicious that it would be shame to wait for the next Halloween to make it again. This could be very practical for party menus.
Yes, maybe you'd better leave out the bloody part except Halloween time:) You can serve them as plain eyes. Good news is.. you would work considerably less this way since you won't need to prepare and pipe royal icing around the eyeballs.
Or you simply serve them as balls decorated with dessicated coconut, candy sprinkles...etc. You won't even need to make eyes and pupils.
Ingredients:
100g Graham biscuits
300g Ricotta
400g white chocolate
Decorate with:
M&M's or Smarties
60g dark chocolate
1 egg white
200g sugar
1 tsp lemon juice
Red food coloring
Preparation:
- Grind 50g of white chocolate for 7 seconds on Speed 7.

- Melt it for 1 and half minute at 50°C on Speed 2.

- Add biscuits and ricotta. Blend for 15 seconds on Speed 5-6.


- Wrap the mixture with plastic film and let it rest in the fridge for half an hour.
- Get small pieces from the dough, roll into a ball shape, place them on a baking paper covered tray. (In the original recipe they prepare 30 eyeballs, instead we prepared 20. It obviously depends on the size you prefer. For me, the size we prepared was just perfect for our needs)
- Put the tray with eyeballs in the freezer for 15 minutes so that they set and harden.
- Break the remaining 350g of white chocolate into pieces and place in a clean and dry TM Bowl. Grind for 10 seconds on Speed 7.

- Melt it for 4-5 minutes at 50°C on Speed 2.
- Transfer half of the melted chocolate in a bowl. (Let the other half stay in TM Bowl. In case it thickens you can easily rewarm it)
- Place one ball at a time into the bowl of melted chocolate. Spoon extra coating over any uncoated areas of the ball to make sure it is completely covered in chocolate. Then lift out the cake ball with your fork gently shaking and draining the excess chocolate. Put it on baking paper. Place immediately a Smarties and press it over gently.
- Continue to coat and decorate the remaining balls as described above.
- Cut the excess chocolate off with a sharp knife when the chocolate is hardened.
- Grind dark chocolate for 7 seconds on Speed 7.
- Melt it for 1 and half minute at 50°C on Speed 2.
- Put melted dark chocolate in a piping bag or paper cone and pipe it onto the centre of the candies to for pupils.

- For royal icing, put sugar in a clean and wiped TM Bowl. Pulverize for 40 seconds on Speed 10.
- Add egg white, lemon juice and red coloring. Mix for 20 seconds on Speed 6. (Of course you will have more royal icing then you need only for this recipe)
- Using a piping bag or paper cone pipe it over the eyeballs forming capillaries.
- Let them rest in the fridge for 2 hours and then serve.
- You can serve them in paper if you wish. We served them in small glass bowls.

Enjoy...
Some of you guys may be interested in the photo effects which I mentioned before. So let me give you the names of the applications and programs I used to prepare them.
For 'Alienated' Missing Persons Board Photos:
- Alien Booth (an iPad and iPhone app)
- Pixlr-o-matic photo effect application. (I used its iPad app but found out later that it is also available as a download, on Facebook, as an Chrome web app and for your iOS or Android device. Their web address is here. I already downloaded it into my PC as well ;) )
For Zombie Photos:
- Monster Booth - Halloween! (an iPad and iPhone app)
- Pixlr-o-matic photo effect application
For Mug Shots
- Web site of Copper TV series
Have fun ;)
Hiç yorum yok:
Yorum Gönder